How to improve the visual appearance of your LaTeX files?
• LaTeX, University, Notes, Styles, Efficiency • 4 min read
Introduction
I have been using LaTeX since I started at university two years ago. You are welcome to visit my notes; I am sure you will notice the progress of the document style, specially between first and second semester. In the latter, I found one that was ideal for me and I have stuck with it ever since.
By the time I am writing this article, I have completed more than 640 pages with LaTeX, taking only into account class notes. I still remember my first attempts to keep up with the lecturer pace —it was a mess. My typesetting skills got better —online classes certainly helped— and, after a lot of practice, here we are.
I will not get into LaTeX typesetting. For that purpose you have a magnificent article by Gilles Castel. As a result of Gilles' workflow, I have been meaning to transition into Vim for a long time, to be honest, but I am comfortable with Overleaf at the moment: a mix of Overleaf —for when in class or at home— and TeXStudio —for when I have no connection, when I am commuting, for example— using Overleaf Git is enough for me.
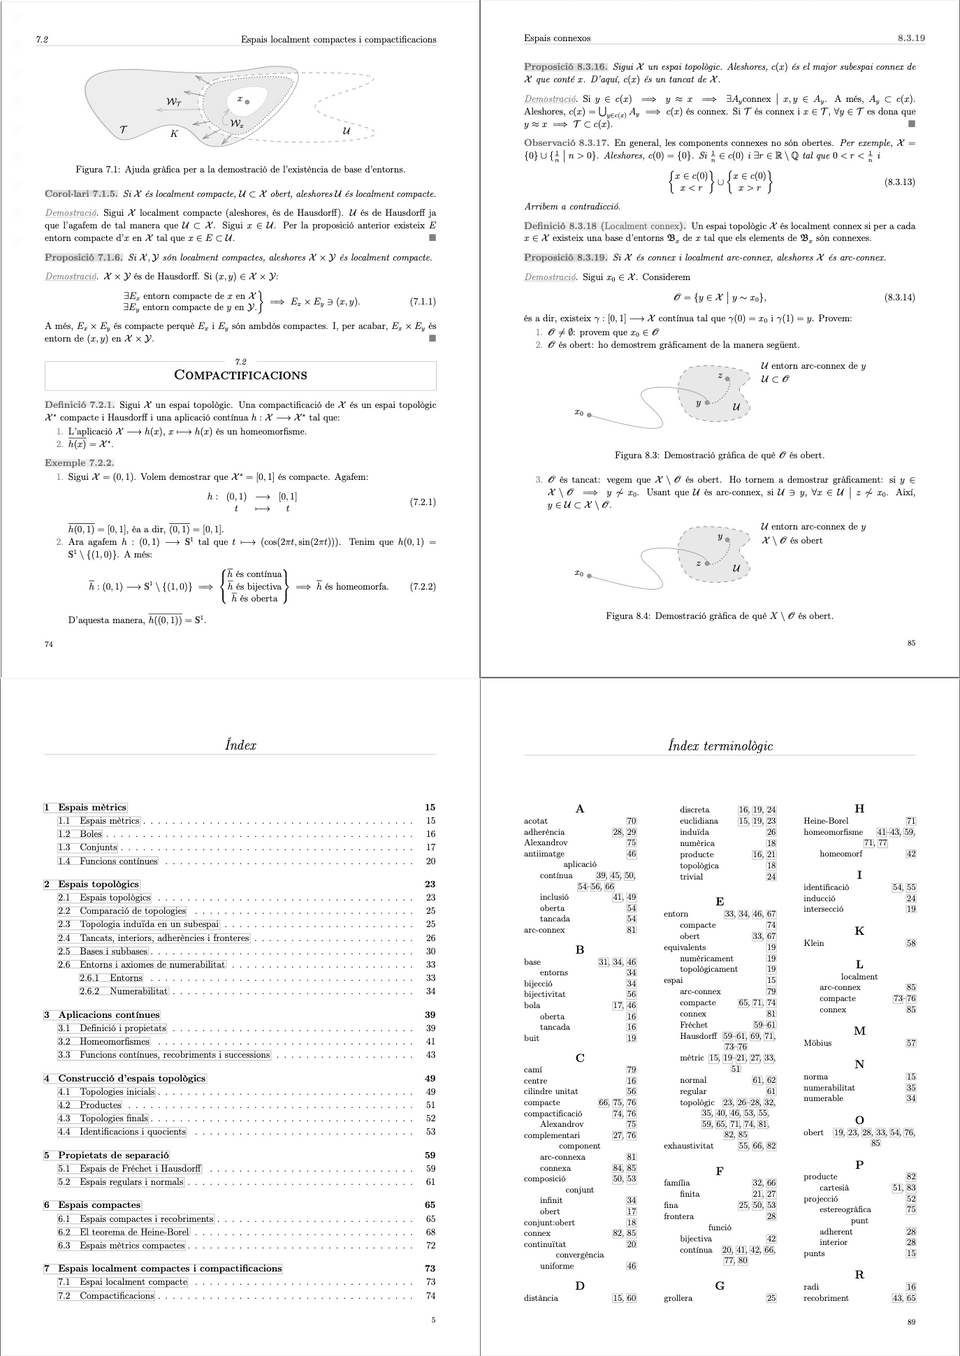
I am going to explain, then, how I edit my documents to display as much resourceful information as possible. I have found inspiration in dictionaries and linguistic books —Ortografia catalana is a great example—, as they must provide an easy system to search through due to their high volume of content.
This template I will be publishing is the result of a team effort: a crew of unselfish developers that invest a huge part of their free time to answer questions on the internet. Some of them even gave response to a few of my own. I have gathered their knowledge and shaped in a way that fulfilled my needs. Credit where credit is due.
Let's get started
Each one of my files has an introduction, where more or less it says:
I work with chapters, sections, subsections and subsubsections. In detail:
- the number of the last section/subsection will be on the even pages, left top corner;
- the name of the chapter will be on the right top corner of odd pages;
- the name of the last section/subsection will be on the right top corner of even pages;
- we will also have the number of the last theorem defined environment on the page, if the page is odd, on the right top corner.
Keep in mind that certain elements will be differently treated, because they might need special styling. Anyway, generally that's done with this code:
1\fancypagestyle{nor}{2 \fancyhead[RE]{\textcolor{black}{\nouppercase{\leftmark}}}3 \fancyhead[LO]{\textcolor{black}{\nouppercase{\lastrightxmark}}}4 \fancyhead[CE,CO]{}5 \fancyhead[RO]{\setlength{\fboxsep}{1pt}{\color{arsenic}\textbf{\botmarks\theoremmarks}}}6 \fancyhead[LE]{\textcolor{black}{\textit{\lastleftxmark}}}7 \fancyfoot[RO, LE]{\fontsize{10pt}{10pt}\selectfont\thepage}8 \fancyfoot[CO, CE]{}9 \fancyheadoffset[LE,RO]{+0.025\textwidth}10 \fancyheadoffset[RE,LO]{+0.0\textwidth}11}12\pagestyle{nor}13\makeatletter14\renewcommand{\chaptermark}[1]{\markboth{#1}{}\extramarks{}{}}15\renewcommand{\sectionmark}[1]{\extramarks{\thesection}{#1}}16\renewcommand{\subsectionmark}[1]{\extramarks{\thesubsection}{#1}}17\makeatother18\makeatletter19\newmarks\theoremmarks20\apptocmd\@begintheorem21 {\message{\@currenvir: #2}\marks\theoremmarks{#2}}22 {\message{patch \string\@begintheorem}}{\FAIL\@begintheorem}23\makeatotherIn fancyhdr version 3, the initialisation was done when the first \pagestyle{fancy} (or one of its derived pagestyles) was given, including the initialisation of \chaptermark and \sectionmark.
Finally, there is a table of definitions right after the table of contents, where you will be able to find a specific definition or theorem very quickly. Furthermore, at the end of the document you will have an index of concepts, with which you could locate a specific word.
That all thanks to a sorting-by-color scheme between definitions, propositions, theorems... that will enable us to work more efficiently.
I will not show heavy chunks of code for the sake of readability. But I will say that Sorting-by-color is achieved with \newtheoremstyle, section titles use the package titlesec and hyperref is set up accordingly to my gray-scale tonality.
Keep in mind that definitions and theorems are not equally defined, that the titles of sections are different from chapter ones... all in all, this article is nothing but a summary of a styles.sty over 500 lines long. Important code is not listed in this article, but this does not mean that has been forgotten. If you are really interested, you will have the opportunity to check it all out. Keep reading!
1\makeatletter2\newtheoremstyle{theorem}{}{}{\itshape}{}{\bfseries}{}{.5em}%3{%4\setlength{\fboxsep}{0pt}\colorbox{darksilver}{\color{arsenic}\thmname{#1}%5\thmnumber{\@ifnotempty{#1}{ }\@upn{#2}}%6\thmnote{ {(\textsc{\the\thm@notefont#3})}}.}%7}8\makeatother9
10%%%%%%% MORE CODE... %%%%%%%11
12\usepackage[explicit]{titlesec}13\usepackage{array}14\titleformat{\chapter}[display]{\itshape\Large\centering\color{black}}{\centering\Huge\bfseries\sc\romannumeral\thechapter}{1ex}{\titleline{\color{lightgray}\titlerule[0.1pt]\vspace{1ex}}#1}15\titleformat{name=\chapter,numberless}[display]{\itshape\Large\centering\color{black}}{}{1ex}{#1}[\titleline{\color{lightgray}\titlerule[0.1pt]\vspace{1ex}}]16\titlespacing*{\chapter}{0pt}{-50pt}{40pt}17
18%%%%%%% MORE CODE... %%%%%%%19
20\usepackage{hyperref}21\hypersetup{22 colorlinks=false,23 linkbordercolor={lightgray},24 urlbordercolor={darkgray},25 citebordercolor={arsenic},26}Lastly, the terminological index is composed by items that were declared using \index{item}. It is rather straight-forward, more than other components: use \usepackage{imakeidx} and you are to go.
If you cannot quite picture it all in motion, here are some examples:

But I am skipping ahead. Ça a débuté comme ça: my preamble. My go-to document class is book, and my first line of code is \documentclass[a4paper,12pt,twoside]{book}. I include my styles.sty file with \usepackage{styles} and my bibliography —\addbibresource{my-folder/BIBL-main.bib}—; I make my index with \makeindex[columns=3, title=Índex terminològic, intoc, options= -s indexterminologicstyle.ist] and, eventually, my document begins.
1\documentclass[a4paper,12pt,twoside]{book}2\usepackage{styles}3\addbibresource{my-folder/BIBL-main.bib}4\makeindex[columns=3, title=Índex terminològic, intoc, options= -s indexterminologicstyle.ist]5\tikzset{every picture/.style={line width=0.75pt}} % set default line width to 0.75pt 6
7\pagestyle{intr}8\pgfplotsset{compat=1.15}9\title{My title}10\tipus{Class notes}11\semestre{Fifth}12\professor{Dr. A}{B}13
14% Document15\begin{document}16\setlength{\baselineskip}{.55cm}17
18
19% TITLE PAGE --------------20\include{tapa}21% ---------------------------22\newpage23\pagestyle{intr}24\input{introd}25\newpage26
27\pagestyle{toc}28\tableofcontents29\newpage30
31\pagestyle{toenv}32\listoftheorems % the list of theorems33\newpage34
35\pagestyle{nor}36\chapter{CONTENT}37...38\end{document}As for the title page, I declare some variables (\titol, \tipus...) in every document to import generic code for the title page —this is, that works with all of them.
1\makeatletter2\renewcommand{\title}[1]{\def\@title{#1}}3\newcommand{\tipus}[1]{\def\@tipus{#1}}4\newcommand{\semestre}[1]{\def\@semestre{#1}}5\newcommand{\professor}[2]{\def\@nom{#1}\def\@cognom{#2}}6\makeatotherIt should look like this after compiling the document:

I have little to say about content. As I said, I do not pretend to instruct you on typesetting. Perhaps some points about component styles and new commands, a more appealing visual experience:
1%%%% PROOF STYLES2\renewcommand\qedsymbol{\color{gray}$\blacksquare$}3\usepackage[normalem]{ulem}4\makeatletter5\newcommand{\grayuline}[1]{{\color{lightgray}\uline{{\color{gray}\textit{#1}}}}}6\makeatother7\renewcommand{\ULdepth}{2.125pt}8\makeatletter9\renewenvironment{proof}[1][\proofname]{\par10 \pushQED{\qed}%11 \normalfont \topsep6\p@\@plus6\p@\relax12 \trivlist13 \item[\hskip\labelsep\itshape14 \grayuline{#1}\@addpunct{.}]\ignorespaces15}{%16 \popQED\endtrivlist\@endpefalse17}18\makeatother19
20%%%% NEW COMMANDS21 \newcommand{\A}{\mathbb{A}}22\newcommand{\R}{\mathbb{R}}23\newcommand{\Z}{\mathbb{Z}}24\newcommand{\Q}{\mathbb{Q}}25\newcommand{\N}{\mathbb{N}}26\newcommand{\C}{\mathbb{C}}27\newcommand{\K}{\mathbb{K}}28\newcommand{\B}{\mathfrak{B}}29\newcommand{\M}{\mathcal{M}}30\newcommand{\J}{\mathcal{J}}31\newcommand{\I}{\mathbb{I}}32\newcommand{\U}{\mathcal{U}}33\newcommand{\V}{\mathbb{V}}34\newcommand{\X}{\mathcal{X}}35\newcommand{\Gram}{\mathcal{G}_\mathfrak{B}(\varphi)}36
37%%%% LIST FORMAT38\setlist{label=\textcolor{gray}{\textbullet},topsep=2pt,noitemsep}39\setenumerate{label=\textcolor{gray}{\arabic*.},topsep=2pt,noitemsep}And right before finishing up, there needs to be a bibliography.
1\medskip2\printbibliography[heading=bibintoc]It is cored by BibLaTeX and it is styled as it follows:
1\usepackage[2backend=biber,3style=alphabetic,4sorting=ynt5]{biblatex}6\newcommand{\familynameformat}[1]{\MakeUppercase{#1}}7\AtBeginBibliography{%8 \renewcommand{\mkbibnamefamily}{\familynameformat}%9}10\let\familynameformat=\textsc11\nocite{*}To sum up:
- Life advice: improve your typing speed. There are a few helpful websites. That way it will be less likely for you to fall behind when taking notes.
- Memorise LaTeX commands for typesetting equations, tables, lists... As there is no way you can remember all of them, keep in mind that Stack Exchange is your friend.
- An organised document is much better than an unorganised one, specially when it comes to class notes. You should be able to locate any piece of information easily.
- Order is a very personal matter. A certain document structure may be perceived positively by someone, but another person may consider it a real disaster. In that sense, I would ask for your colleague's advice if you aren't working alone. The golden rule is: when in doubt, keep it simple.
Last observations
Surprise! I will be posting a repo with a Minimal Working Example on GitHub. If you end up using my template, please be decent and recognise the author —me— for their work —my work— when possible. Again, credit where credit is due.
If this article has helped you, please consider buying me a book!
